ARC Raiders Bird City Trial Guide:Best Build, Route, and Scoring Tips
Jun-22-2026 PST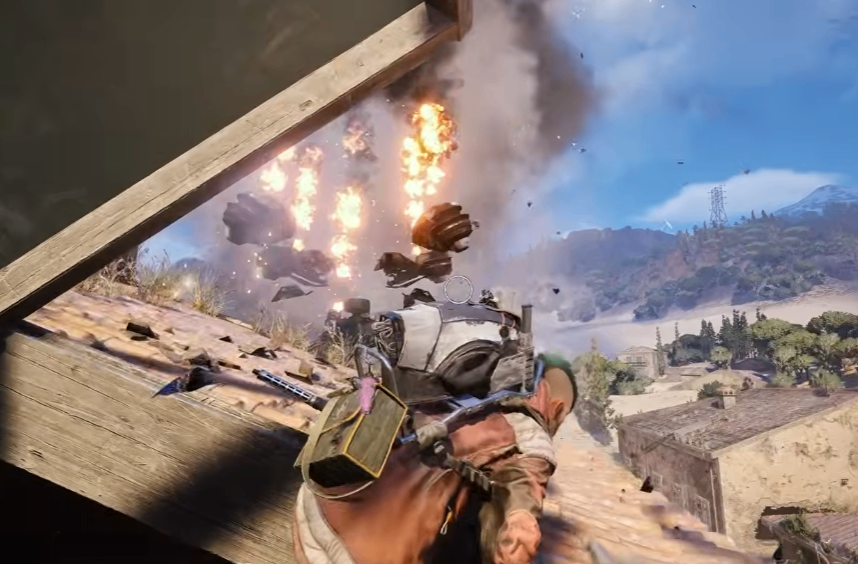
In ARC Raiders, is the Bird City event really worth farming? Why are other players easily breaking 10,000 points while you're stuck around the passing line? The truth is, it's not about aim-it's about choosing the right route and strategy. Using an Anvil and Borepiercer setup, I personally pushed a single run to 31,539 damage score, with nonstop enemy waves and constantly rising points. This method doesn't require top-tier gear or fighting over kills for ARC Raiders Items. Once you learn it, climbing the leaderboard becomes much easier. Here's exactly how it works.
WHY BIRD CITY IS THE BEST SCORING MAP
Many players focus on the "Close Inspection" trial because of ARCR Items for sale its high theoretical score ceiling. The problem is competition-almost every match is packed with players running Jupiter weapons, instantly deleting enemies and splitting score opportunities.
Bird City is completely different. Far fewer players prioritize this trial, meaning every shot you land translates into real, uncontested score. Even better, small flying ARC units spawn at extremely high frequency, creating nonstop scoring opportunities from start to finish.
DON'T WANDER-UNDERSTAND THE MAP FIRST
Once you spawn in, your first move is simple:head straight to Old Town.
The key reference point is the highway.
The highway acts as your scoring boundary.
Staying south of the highway means kills and damage count toward trial score.
Crossing north means no score gain.
Positioning correctly is the foundation of high scoring.
START WITH BIG TARGETS, NOT SMALL ONES
A common mistake is chasing small enemies at the start. The correct approach is:
Prioritize large ARC units first.
Why? Because large enemies respawn.
Kill them early to start the respawn timer, then farm them again later in the match. One run can generate multiple full scoring cycles from the same targets.
One match can give you 2-3 full scoring cycles from the same targets.
HOW TO HANDLE HEAVY UNITS
Mortar units are easier than they look:
You can face them directly, but rely on movement timing.
Dodge based on audio cues. Move left or right after each shot.
Aim for the weak core instead of limbs.
It takes roughly ten Borepiercer shots to eliminate one target.
Fire, strafe 10 to 15 feet, fire again, and keep repositioning.
While moving, reload constantly to avoid downtime.
Looting matters too-Rocket and Mortar units now drop extra Borepiercer ammo, helping you sustain long fights.
SMALL ENEMIES and INFORMERS = YOUR MAIN SCORE ENGINE
After clearing big units, shift focus to flying ARC enemies:
Hornets and Fireflies are higher value than basic fighters
Spawns are extremely dense; only short downtime appears per match
Informers are especially important:
Lure them in, let them summon reinforcements, then eliminate all units together.
Each cycle can reward nearly 1,000 points.
SMART USE OF ABILITIES AND GADGETS
Wolves:
Don't waste them early. Save for:
Stealing big kills from other players
Endgame respawns for bonus scoring bursts
Homing grenades:
Your emergency tool:
Break enemy swarms
Secure kill credit when contested
Instantly handle grouped small ARC units
BIG ENEMIES AND RESPAWN LOOP
Large ARC units respawn in about 7-10 minutes.
Watch for:
A dark smoke cloud in the sky = respawn signal
Once it appears, immediately rotate back and restart the farming cycle. This is where most of your total score comes from.
VERIFYING YOUR SCORE ZONE
To confirm you're scoring correctly:
Check your current score in the log
Deal damage to enemies
Check again-if it increases, you're in the correct zone
Simple but important for consistency.
EXTRACTION:DON'T GET GREEDY
This is where most runs fail.
Rule:start extraction with 10 seconds left.
I once died at extraction after getting greedy-lost everything to a Jumper ambush. Since then, I never risk it.
Even a small delay can cost the entire run.
SUMMARY
This Bird City strategy works because enemy spawns are continuous and predictable. Unlike other trials that rely heavily on competition or randomness, this method provides steady scoring opportunities throughout the match.
By controlling position, prioritizing large enemies, and managing respawn cycles, your score becomes consistent and highly scalable.
CORE TAKEAWAYS
Stay south of the highway in Old Town
Kill large ARC units early to trigger respawn cycles
Use Wolves and grenades only for high-value moments
Extract at the 10-second mark-never risk overtime
WHO THIS IS FOR
New players struggling to break low scores
Mid-tier players who want consistent leaderboard gains
Competitive players optimizing respawn farming cycles
Casual players who want efficient, high-reward sessions